 |
| (Almost) Instant Gratification |
Recipe Adapted from Happy Girl Kitchen
Red raspberries: my absolute favorite fruit! They’ve been
scarce this summer compared with golden raspberries, which are also delicious
but too subtle in flavor to make good jam. Since raspberry season is so short, preserving them in light honey sauce is a way to eat them almost indefinitely. This
year I also tried raspberry jam, adapted from the Happy Girl Kitchen recipe for
Low Sugar Strawberry Jam that I posted a couple of weeks back.
 |
| Letting Berries Macerate |
 |
| Raspberries Foam Only Slightly |
Like in any jam, we’ll release air from the fruit in the jam
making process. You’ll see foam when the jam begins cooking, and unless this
air is cooked out your jam will be foamy. Luckily, raspberries contain little
air, which reduces the cooking time. And this is a good thing since we’re
fighting the high seeds-to-pulp ratio. Start testing for the gel point (details
in recipe) as soon as the foam dissipates.
If you’re new to jam making, do yourself a favor and set up
your area with all the tools you’ll need before you start. For details, check
out the Low Sugar StrawberryJam recipe from earlier this month. It’s easiest to use jam-specific tools. Note that Happy Girl jam recipes require letting the fruit, sugar, and lemon juice sit and
macerate for at least 8 hours. It’s most practical to do this overnight, or
start very early in the morning. However, the batch in the photos was cooked at
8 pm on a school night. It’s often hard to squeeze in jam making time, but it’s
always worth it when you taste the results.
makes 28 oz.
2 lbs. organic red raspberries
8 oz. (by weight) evaporated cane juice (unrefined sugar)
2 tbsp. fresh lemon juice
Wash raspberries and drain very well and/or pat dry. Combine
with sugar and lemon juice and cover. Let sit in a dark, cool place overnight,
or for at least 8 hours. You can let it sit for up to 2 days if you need to,
but be sure that the temperature stays cool.
The next day: Put 2 or 3 saucers into the freezer. You’ll
use these later to test whether the jam has gelled.
Wash jars in hot soapy water and boil for 15 minutes in a
pot of water that covers jars by 2 inches. Remove jars from water bath with jar
lifter. Drain upside down on kitchen towel located where you’ll be filling
the jars with jam. Don’t pour out the hot water bath, you’ll use the same pot
of hot water to process the jars of jam.
 |
| The Right Stuff: Jar Lifter is Faster & Safer |
Mash the fruit with a potato masher or similar hand held
tool. Put fruit in 8 quart deep stainless steel or enamel pot. You may use a somewhat smaller pot for this
jam, but depth helps prevent splatters. Bring fruit to boil over high heat,
stirring constantly.
Boil the mixture on high heat, and keep stirring constantly.
Wearing an apron and oven mits helps prevent burns. Foam will appear around the edges of the pot.
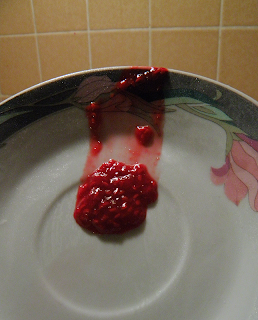
Continue stirring till foaming subsides. Once all the foam is gone, start
testing to see if jam is gelled.
 |
| Close Enough to Gel Point |
When gel point is reached: Fill first jar to within ¼ inch of top, using a wide mouth jam funnel and measuring cup or ladle. Wipe the top of the jar and threads with
a damp paper towel. Fish a lid from the hot water with a lid lifter and shake off water. Place on top of jar. Screw a ring onto jar
loosely, barely finger-tight. Avoid over-tightening as air must escape during
hot water processing in order to seal the jar.
Repeat this process with all jars until all jam is used. A heat-proof spoonula is a good tool for scraping out the bottom of the pot. If the last
jar is only partially filled, don’t hot water process that one. Store it in the
fridge and eat it within a few weeks.
 |
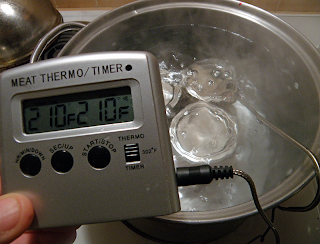
| Digital Meat Thermometer Eliminates Guesswork |
Put heat under pot again and bring water temperature to 210
degrees F. Process for 5 minutes, keeping temperature constant by adjusting heat
and/or position of pot on stove. Remove pot from heat.
Use jar lifter to remove jars from hot water bath. Set each jar on kitchen towel.
Don’t set directly on any cool or fragile surface. As soon as jars are cool
enough to handle, tighten rings. I just discovered an inexpensive ring tightening gizmo that makes this a cooler (literally) job.
Cool for several hours or overnight. Lids must “snap” down to seal. If after cooling you can depress the center of the lid, it is not sealed. You can either refrigerate that jar and eat it within a few weeks or remove the ring and lid, wipe the jar top and threads with a damp paper towel, and reprocess.
Cool for several hours or overnight. Lids must “snap” down to seal. If after cooling you can depress the center of the lid, it is not sealed. You can either refrigerate that jar and eat it within a few weeks or remove the ring and lid, wipe the jar top and threads with a damp paper towel, and reprocess.


No comments:
Post a Comment