 |
| It's All About the Fruit |
Recipe adapted from Sunset magazine, August 2006
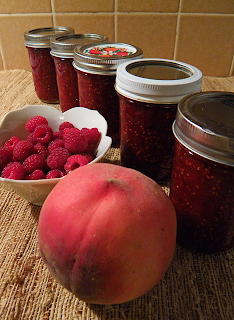
Peaches and raspberries, my absolute favorite fruits. Peach
melba aside, we rarely see them combined. Since both peach and raspberry
seasons are winding down, now is the perfect time to preserve these fruits in a
jam to enjoy all winter. As you’ll remember from August’s recipe, raspberry
jam is tricky because if it’s cooked down too much, there are too many
seeds and too little jellied fruit. Peaches are the perfect foil for this
dilemma, adding fruity bulk without seeds and lightening the color from crimson
to an agreeable bright red. And the flavor is unique and fun.
 |
| Simple, Beautiful Ingredient |
 |
| Stirring it up Before Heating |
This jam is a top pick for an unusual holiday gift,
especially paired with Low Sugar Strawberry
Pineapple Jam.
Makes ~ 6 half-pint jars
2 lbs. peaches, weighed with pits removed
6 oz. (2 half-pints) red raspberries
3 cups evaporated cane juice (raw sugar)
6 tbsp. fresh lemon juice
6 half-pint canning jars, lids, and rings
Cut peaches into pieces 1 inch or smaller pieces. Weigh out
2 lbs. of peaches without pits.
Put 2 or 3 saucers into the freezer. You’ll use these later
to test whether the jam has gelled.
Wash jars in hot soapy water and boil for 15 minutes in a
pot of water that covers jars by 2 inches. Remove jars from water bath with jar
lifter. Drain upside down on kitchen towel located where you’ll be filling
the jars with jam. Don’t pour out the hot water bath, you’ll use the same pot
of hot water to process the jars of jam.
Stir together peaches, raspberries, sugar, and lemon juice
in an 8 quart deep
stainless steel or enamel pot until well combined and liquid-y. You may use
a somewhat smaller pot for this jam, but depth helps prevent splatters. Bring
fruit to boil over medium high heat, stirring very frequently.
Put clean unused jar lids into a small bowl and add some of
the boiled water from the hot water bath. Leave the lids in the water until you
need them. It’s easiest to use a (jam making specific) magnetic
lid lifter to get them out of the water.
Boil the mixture on high heat, stirring constantly. Wearing
an apron and oven
mits helps prevent burns. A little foam will appear around the edges of the
pot. If peach chunks seem too big, mash slightly with potato masher. Continue stirring till foam is gone and jam is glossy, about 15 minutes. Start testing the jam for gel point. If jam fails the gel point test (below,)
boil and stir two more minutes, then test again. Repeat as necessary till gel
point is reached.
 |
| Nearing the Gel Point |
When gel point is reached: Fill first jar to within ¼ inch of top, using a wide mouth jam
funnel and measuring cup or ladle to scoop up the jam from the pot. Wipe
the top of the jar and threads with a damp paper towel. Fish a lid from the hot
water with a lid
lifter and shake off water. Place on top of jar. Screw a ring onto jar
loosely, barely finger-tight. Avoid over-tightening as air must escape during
hot water processing in order to seal the jar.
Repeat this process with all jars until all jam is used. A heat-proof
spoonula is a good tool for scraping out the bottom of the pot. You don’t
want to waste any delicious jam! If the last jar is only partially filled,
don’t hot water process that one. Store it in the fridge and eat it within a
month.
 |
| Cheap Meat Thermometer Monitors Water Temp |
Put heat under pot again and bring water temperature to 210
degrees F. Try to keep water under 212 degrees, so jam won’t boil up. Process
for 10 minutes, keeping temperature constant by adjusting heat and/or position
of pot on stove. Remove pot from heat.
Use jar
lifter to remove jars from hot water bath. Set each jar on kitchen towel.
Don’t set directly on any cool or fragile surface. As soon as jars are cool
enough to handle, tighten rings. I recently discovered an inexpensive ring
tightening gizmo that makes this a cooler (literally) job.

No comments:
Post a Comment