 |
| Serve Now or in Winter |
Happy Girl Kitchen
As recently as last week I’d never heard of an American plum, also known as a wild plum. But according to locals, we have one in our yard. “Prunus americana is over these (Santa Cruz) mountains!” said an old timer at the nursery. In the few years we’ve been here, fruit has been tiny, red, and not edible-looking, and the tree’s identity mystified even our arborist friend. This year, after pruning by said arborist, branches are heavy with small, yellow, tangy plums. Because of its placement, right beside a fence post and snuggled up too close to a parking spot, hubby Bruce suspects the tree is a volunteer. According to folks at the nursery, the American plum volunteers readily throughout the central and eastern US as well in these coastal mountains. What could be better than a fruit-producing volunteer, even if we need to move a parking spot?
 |
| Helpful Tools: spoon rest, lid lifter, cup with spout, thermometer, jar lifter, canning wrench |
makes 6 pints
5 lbs. small plums
6 cups water
1 cup honey
1 cup evaporated cane juice (sugar)
6 jar lids and rings
Sterilize the jars by boiling in hot water, inverting, and
letting air-dry. Pour very hot but not boiling water over washed lids and rings
and leave submerged in water. Wash the plums and pat dry. Cut an X into each
plum where the branch inserted with a small sharp knife. This will help the
honey to penetrate the fruit.
Combine water, honey, and sugar, and heat to 200 degrees F
over medium heat, stirring constantly. If mixture boils up, remove from heat
and reheat over lower heat till thermometer comes close to 200 degrees.
 |
| A Few Leftovers |
Process in hot water bath canner (or large pot of boiled
water that will cover jars by at least 2 inches) at 210 degrees for 25 minutes.
Keep water below 212 degrees F to minimize risk of sauce boiling out of the
jars.
Remove jars from hot water using jar lifter or tongs. Set gently on kitchen towel on countertop. As soon as jars
are cool enough to handle, tighten rings. An insulated glove and canning jar wrench make tightening rings easier. When completely cool, check to be
sure that each cap has “snapped” down, sealing the contents (if you can push
the lid and make a snapping noise, it is not sealed).
If a jar did not seal, remove the ring and cap and wipe the
top of the jar dry. Check the cap to see if it looks bent—if so replace it. If
not, rinse off syrup and dry it completely. Add more honey sauce if needed,
re-cap and (loosely) ring the jar, and process again in the hot water bath.
PS, If you’re new to canning, purchasing an inexpensive
(~$10) canning kit will save time and make handling the jars during the canning process
easier. It will give you years of service for making jam as well as preserving
fruits in honey sauce. If you don't have a canning pot with a built-in thermometer, a programmable meat thermometer (<$20) is indispensable for keeping water bath just below the boiling point. We use a combination meat thermometer and timer, handy for timing everyday kitchen activities as well as for canning. And occasionally we even use it to check the temperature of cooked meat!
 |
| Scruffy Volunteer or Hearty Provider? |


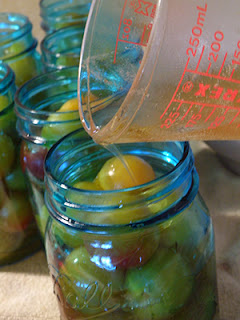
The jars and plums look GREAT together!
ReplyDeleteL
They do look rather sexy, LOL! Thanks for the cool jars, L.
Delete